Showing posts with label SBS. Show all posts

Wednesday, February 27, 2013

Skill Builder Sampler FINISHED

Back September/October I decided to divide my skill builder sampler blocks into two lap quilts for my parents' November birthdays.  I actually put 3 solid fabric blocks in each front and then put 4 of the SBS blocks on each back.  (and of course I didn't take a picture of the backs. But I did remember to snap pictures of the fronts with my phone.)

I am really happy with how they came out and looked once I got them quilted and bound.  

The fronts:


Tuesday, May 1, 2012

Skill Builder Blocks 28, 29, 30 Odd Shapes

This month we focused on making odd shapes.  And continued using skills we'd already learned - sewing curves, triangles and template work.   

28, 29, 30

The first block was tumblers.  I love the look but it took me a few tries before I got the hang of how to sew them straight.  This is a design I would probably use on a much larger scale one I buy a plastic template.  The one I made out of card stock definitely got shaved down smaller and smaller the more I cut!  There's a pretty noticeable difference between the pieces I but first and the ones I cut last.
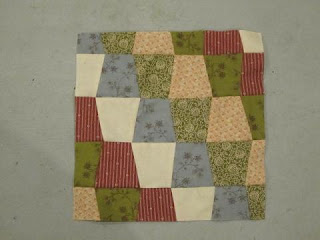
Originally, I wanted to do a completely random arrangement.  But after fiddling around with the tumblers for about a half an hour, I realized I would just have to make a design.  Random wouldn't work for me!

I also LOVE the look of apple cores.  I think entire apple core quilts are amazing.  I thought, if this block goes well, I have a future quilt idea.  sigh.  The thing I DON'T love about apple cores is because of the curves, cutting them out with my rotary cutter is out of the question.  And I don't have a cricut or any other such cutting machine so that left me with scissors.  After cutting 9 apple cores for a 12in block, I had definitely decided I was not adding an apple core quilt to my future quilt idea list ANY time soon.
In my always present thought of keeping the main fabric MAIN, I decided to make it  the corner fabric instead of the center. I didn't want the main green to be the border.
 This Equilateral Triangle Block was SUPER fast to sew together.  The longest thing was cutting out all the triangles.  And AGAIN my cardstock template ended up smaller than I started.  A would make a triangle quilt like this with a plastic template.  It definitely sews together really quickly.
I cut 6 of the main green triangles and the other greens (excluding the solid mint) only had two.  I accidentally flipped the top half and bottom half when I sewed them together, but it wasn't a mistake I wanted to fix.  It didn't really mess anything up, just changed my design

I really like working with all this fabric now.  Which is such a change from when it first arrived.  It's also fun to see 3 blocks a month added to the design wall.

Also Leila, who hosts the Skill Builder Sampler tutorial on her blog, does a random giveaway of fabric for everyone that finishes the 3 blog set on time.  The longer the series goes, the fewer people complete the blocks.  Sooner or later, I'm going to be a random winner.  I just know it.  ;-)

Thursday, April 5, 2012

SBS Blocks 25, 26, 27 (Wonky)

After a bit of a break, we are back at it with the Skill Builder Sampler.  This set concentrated on wonky blocks.  And the first one just happened to be something I have 2 throw quilts worth of experience on: the wonky log cabin!

the wonkies

Block 25: Wonky Log Cabin

Block 26: Wonky Star

Block 27: Wonky Fan
I really liked these blocks.  They were all pretty easy and fun.  I feel like the more I work with the fabric the more I like the fabric choices for each block.  I really do put a lot of thought into which fabric goes where and  which other ones look good with it.


Friday, February 3, 2012

SBS Blocks: 22, 23, 24

January was the month of CURVES.  A new skill for me and a fun one to learn.  My biggest concern about these blocks are the templates and making sure I make them accurately on the card stock and then trace them out accurately on to the fabric. THEN cut them out with scissors.  See?  Lots of room for error.  I definitely took my time and was extra careful.

22, 23, 24: curves galore

The flowering snowball was pretty easy to make but what I love about it is how it "flowers."  Each block builds on the next making an amazing effect when used for an entire quilt.  Seriously, scroll down to the bottom of this link and see how Molly Flanders fleshes this out.

The Drunkard's Path.  The construction and sewing of this one was pretty easy too .  I like the contrast between the light and dark orange.  Plus, I like the placement of the curves.  If I had to do this one again, I'd make the orange a little bigger and the green center a little smaller.  But overall, I'm satisfied.  This is the first time I actually made my own template, based on Leila's instructions as opposed to just printing an already made one off.  That was an exercise in math and understanding.  But it's a nice skill to have now instead of having to rely on premade templates, I have a better understanding of how to make my own.
Curved 9-Patch.  Or maybe "stretched" would be a better word.  It looks like someone grabbed the four corners and pulled.  This tutorial came from Connectingthreads.com.  I seriously, love them.  JSS introduced me to their great website. And I've never been disappointment in any fabric I've purchased there.  Remember the collection I'm using for all these blocks came from Connecting Threads.  Plus, I just bought fabric for THREE baby girl quilts for expecting friends.

It was a fun month of curves.  I'm ready for what's next.

Thursday, January 12, 2012

SBS Blocks 19, 20 & 21

December was the month of applique.  WOW, lots of applique. This is my first time to do applique "for real"  I played around with it a little when I first got my new machine.  But I wasn't entirely sure what I was doing was "right" or even how to make my poor attempt better.  So, this really was a fun month of learning for me.

For these blocks, I decided to make the backgrounds cream, so the applique would stand out better.  But I still wanted my "main green" to be the focal feature of each block.  I'm not an expert yet, but I'm a lot better and I'm pretty pleased with how the blocks turned out.


Blocks 19, 20 & 21

Block 19: Orange Windows
this is my new FAVORITE block (yea, yea I know.  I say that a lot.)  I'm just really pleased with how my color placement worked out.  I love the green petals in the middle.  We used raw edge applique on this one with Heat N Bond.  This is my first time to ever use Heat N Bond.  And let me tell you, I'm hooked.  LOVE IT.  After I finished this block, I actually sat down with some graph paper and drew out a couple of patterns of how to turn this one block into an entire quilt.  fun times.
 Block 20: Circles
With this block the edges are finished or turned under.  Harder  than the  simple raw edge method.  I chose Cheater Needle Point Applique as my method to turn my edges under.  Mainly, because I thought it would be the easiest method for me to do.  And it was pretty easy.  I liked it.  But I definitely think that in the future, when the situation arises that I need/want to applique something, it's RAW EDGE with Heat N Bond all the way!
Block 21: Applique Pattern of Choice.  I chose Tulip Trees
With a list of blocks to choose from, I chose Tulip Trees.  It just so happened that the block that I thought was the prettiest, also looked the easiest.  Sheer coincidence on that one!  I really like the way it turned out, color choices and such.  BUT I used an orange washable crayola marker to mark my fabric ... and I'm less than thrilled at how it looks after my attempt to hand wash it.  yes, I know I could serge the edges and throw it in the washing machine.  But I decided not to mess with it anymore.  It'll have to wait until it's quilted and washed before it's orange free.  I did go to walmart later that night to get an invisible ink marker.  I'm finished with the orange mess.  
So, this month I not only learned how to applique, but I also learned the important of disappearing ink!

Thursday, December 1, 2011

Skill Builder Sampler Blocks 16, 17, 18

I spent November paper piecing.  Well, that's a little inaccurate.  I spent November printing out tutorials for paper piecing and then sat down Sunday and cut out fabric for these 3 blocks and put them together on Monday night (well, I actually finished Tuesday).  Nothing like waiting until the last minute to get caught up!

I have a deep love for paper piecing.  I love the neatness, the accuracy and how the blocks almost seem to come together like magic.  love. Even though there are a lots of steps that seem intimidating at first, it was all pretty easy.

My goal this month (aside from learning to paper piece like a champ) was to try to show off some of the fabric that hasn't gotten to the be "star" of a block yet.  I just wanted different color schemes.  Since I've got all the blocks in order on my design wall, it's a lot easier to glance up and see what fabric hasn't had top billing yet.

16, 17, 18
overall I'm pretty satisfied with the results

Block 16: Minnesota
um, this block is "perfect and shiny" as Son would  say ... except the top left corner.  Someone (cough, cough ME) wasn't paying enough attention. But I really do love the color combinations.

Block 17: Starry Night
sigh.  This template got printed at 96% instead of 100%.  sigh.  And instead of redoing it, I just tacked on  half an inch to the left and bottom.  Everyone repeat after me: CHRISTY, PAY ATTENTION!!
Block 18: Circle of Geese
This template got printed off at 96% too.  But luckily I realized it before I started sewing.  (YAY, Finally paying attention!)
When I was picking out fabric for this block, it was important to use all of the unused .  Remember, I have to use all the fabric before I can start over with picking again.  In hindsight, I'd say, I should have kept all of the geese non-green instead of being so focused on using all the fabrics.  I think the 4 green ones sort of fade into the green background.  But I still like it.

 While I was waiting on Husband to print out the 100% sized template out at work, I did a practice block on the 96%.
This is some of the yellow/black/grey/white Walmart fabric that I LOVE.
Plus, since I went through the tutorial with this practice block the night before, I was able to really speed through putting the "real" block together.

Friday, October 28, 2011

Skill Builder Sampler Blocks 13, 14, 15

These 3 blocks are probably my favorite collective 3.   Ever week when I sit down to choose fabrics for the block, I worry.  I worry that I'll run out of fabric.  So the first two made me excited because they used scraps that have been too small for other things. Blocks 13 and 14 came exclusively out of my scrap bag.  And Block 15 features two NEW fabrics.  Yes.  I was worried enough (and the fabric is still on clearance at connectingthreads.com and I wasn't sure how long until it was all gone) that I bought 4 more fabrics out of the collection that I didn't have yet.  Greens and browns.

Block 13 String Blocks
I made the "center strip" the main green fabric and  used lights for the inner pieces and darks for the outer pieces.  I made the entire center the "accent" non matching green and it looks a little different than I pictured in my head.  I think there is less contrast in the size of the 4 pieces than I wanted.  It almost looks like I wanted them to connect and make a diamond in the middle and just messed up.  eh. whatever. I still like it.
I really LOVED doing this.  I could probably make an entire quilt like this.  very fun.  Plus, it's my first non-knit paper piecing.
Block 14 Crazy Quilt Block
I made a rule for myself on this block.  I had to use every fabric I had, it had to come out of the scrap bag and  I had to cut it as little as possible.  I like the result.  (This was pre the new fabrics arriving in the mail) Also, it had a fabric foundation.  I used a scrap white I had because I didn't want any print to show through on the lighter fabrics.
two of my favorite "fancy stitches"  I used.  
Block 15: Diamond Dash
This one is one of my absolute favorites.  I think the only block I like better is my Churn Dash.  And this is called Diamond Dash.  I guess I have a thing for dashes.  ... (crickets) ...   Anyway, it was really easy plus I was proud of my points.  LOOK AT THOSE AWESOME POINTS!  seriously.  It's nice to see my skills improving a little in this process.  The diamonds are paper pieced.  And this is also the two new fabrics.  I have the designs in other colors but I wanted to add some brown to my selection.
I'm almost bummed this is an off week.  I've really enjoyed this series and they helped me get back in the groove of sewing.

After looking at these pictures, I'm rethinking my "take block pictures outside on the fence" idea. I think I can do better.

Friday, September 30, 2011

SBS Blocks 10, 11 & 12

I kept putting off and putting off these 3 squares.  Oh, and I put them off some more. I seem to have lost a bit of my sewing mojo since I've moved downstairs. 

WAIT. WHAT?  I move downstairs to my own sewing space and suddenly I'm not excited to sew anymore?  eh, something like that.  It's hard to explain.  But when I did sit down and put all three of these together Wednesday night, it definitely felt great.  So maybe the sewing slump is nearing an end.  

Here's hoping anyway.

For this series we focused on Quarter Square Triangles and Improvisational Piecing.  Quarter Square Triangles? loved.  Improvisational Piecing? negative.  I seemed to forget how to add seam allowances, making my improv pieces much smaller than needed. Which meant more sewing and add-on pieces.

blocks 10, 11, and 12
Block 10: The Ohio Star
Super easy.  And I liked the idea of a blue/green block because I already have a red/green block.
Block 11: Beacon Light
I liked making the smaller quarter triangle squares but I didn't like improving the pieces.  But I do like the finished result.  Except the whole time I was making it, I pictured the top being what is the right side in the picture.  So that's throwing me off looking at it.  Sure, I could've gone back outside and taken another picture but, eh.  
Block 12: Improv House and Tree
I hated this one but it's all my fault.  I'd originally  planned on the roof to have eaves (hang over the sides of the house), but then I had to cut it down a little so the whole house could fit in the block and there still be enough room for as much "grass" and sky above the house that I wanted. Truth be told, I'm disappointed in the block because it's not what I wanted it to look like, but as Husband said, "It looks great and you're the only person who thinks it should look different."  I thought about redoing it but I don't want to waste fabric so I'm leaving it as a reminder to pay better attention. As a first attempt it's not bad, but I know it could be better.
I really did like making the Quarter Square Triangles.  I think I could make those all day long.

Because Connecting Threads (the GREAT website where I bought this fabric) currently has it on clearance, I'm thinking about buying a few of the prints/colors that I didn't get the first go around just for a little extra diversity ... and because my biggest fear is that I may run out of fabric before I'm finished!!

Friday, September 2, 2011

SBS Blocks 7, 8 & 9

This month on the We Can Do It! Skill Builder Sampler we made flying geese.  Enough flying geese that I know how to make flying geese and I'm ready to move on to something new!  I think it was like 28 flying geese.  That's enough.  (actually, I made more because I miscut some fabric and had to start over)

Again, the hardest part ended up being which fabric to use and where to put it.  Balancing light and dark and patterns and solids and yada yada yada.  I still like my fabric choices but part of my wishes I'd picked cream of the main color instead of the green.  But this is a constant back and forth thought in my head.

blocks 9, 8 and 7


block 7. The Virginia Star.  Originally, I was going to make this an all green block, but  I ended up cutting  some pieces too small, making the whole block too small.  So I redid it and changed out one of the greens for a light blue that is just barely in the main center square.  You really can't even see it, unless you're right up on it.  But I really like the look the touch of blue gives the block. This is the first good look of the green center fabric I've been able to show.  I used it earlier in the 9 patch block, but it was cut to small to really get a good idea of the pattern.
block 8, Breaking Out.  I really like this one.  I thought about a solid red for the middle geese, but decided to use the red pattern and I still think it had enough POP to anchor the middle. This was my favorite block until ...

block 9, The Double Star.  I LOVE THIS BLOCK.   I don't know if it's the color combination or the design or both, but it's my favorite. I love the cream in the center (as the sun, as Daughter calls it) surrounded by the bright orange and then the lighter orange on the outside.
 Today marks an "off" or "catch up" week.  I'm excited to see what's next.

Friday, August 5, 2011

SBS Blocks 4, 5 & 6

Three more blocks are finished and I find myself looking forward to Fridays more and more just so I can see what I'm sewing next!

The Pinwheels were fun.  The Arizona was exhausting and the Bowties were so refreshingly easy, I almost made two blocks of them!

blocks 4, 5, and 6

The Pinwheels

The Arizona.  This one was exhausting to make AND to make fabric choices on.

I tried out 4 different center blocks and 3 different triangle options were I ended up putting the  cream triangles.  I kept struggling with thinking the blocks were TOO dark.   Dark IS what I'm going for (hence the green background) but I don't want gloomy dark, just a warm dark.  So after lots of changing around and figuring, I think I struck that balance.
UM, while looking at the Arizona picture, I JUST REALIZED the top middle square of dark blue is different from the other three.  MAN.  Only time will tell if I decide to fix it.  (right now I'm leaning towards no)


The Bowties

This one really was so easy and now that I'm looking at it I see the colors are almost EXACTLY identical to the pinwheels!  Sheesh.  I'm going to have to consult previous blocks before piecing new ones to ensure diversity!

Blocks 5 and 6 I pieced with the new machine and I could tell such a difference.  I KNOW that being able to set the speed so I don't run away at a high speed is helping me maintain control of the fabric, leading to straighter lines and better lined up seams and a cleaner overall look.  

We're moving on to Flying Geese for the next 3 blocks and I know I've heard and seen the term before but I can't picture them in my head.  So, I'm off to google to see what I'm in for!

BTW, if you're interested in seeing what everyone else is doing with their blocks, this is the flickr group for the sampler.  Some of the are just genius.  Great fabric and color choices.  

Monday, July 18, 2011

SBS Blocks 1, 2, 3

The deadline to have the first three blocks finished to be entered to win 4 Kona Cotton fat quarters was the 15th. So I figured I should go ahead and debut them on the blog. (they've been on flickr for about a week)

I've been going back and forth about whether I like the fabric, don't like the fabric, thinking it looks old lady-ish, thinking I should have got something else, thinking it looks vintage-y ... to deciding once and for all -- This is what I bought and the more I use it, the more I like it. The end. I like it.

Block 1 (Log Cabin)
I did a spiral

Block 2 (9 Patch)
The solid Meadow fabric is really the only color that I don't think "belongs" in the collection but it's growing on me as a fun wild card fabric to throw in.

Block 3 (Dash Churn)
I really liked doing this one. I've never done triangles before and Leila's technique is really easy making the final product look like a lot more work than it was.

1, 2, 3.
I've kept the main green fabric running as the dominant color through out and it's all really growing on me. The more I look at them, the more satisfied I am.
There are still 4 fabrics in the collection I haven't used yet. So, including the main green, maybe the next block will use 5 fabrics. I going to try to distribute them as evenly as I can to make them last throughout all the blocks. (mostly because I'm pretty afraid I'll run out of fabric and won't be able to get more!)


My mom bought me a Brother SQ9000 a couple of weeks ago and I've decided to make her a quilt as a thank you. All these new blocks are definitely giving me lots of ideas to choose from!

Thursday, June 23, 2011

We Can Do It!

JSS asked me to join her in the We Can Do It! Skill Builder Sampler Leila is hosting at Sewn (henceforth known as SBS in my tags). ok, fun. Plus, I can learn new things.

Deciding on fabric is such a hard decision for me. Seriously, there is so much amazing fabric out there. I ended up settling on the Bed & Breakfast Collection at Connecting Threads. I bought the fabric for the kids' quilts there and I really like them. The main reason I chose it over another collection I really liked was because it was on clearance. Husband reasoned that down the line, the other collection I liked slightly better will be on clearance so it'll even out. I needed 9 yards, so the sale definitely helped!

Here's what I got. Husband picked out a few fabrics and I picked out a few (I didn't get everything in the line)

I got 3 yards of this as my "main fabric" so it'll be the main fabric in all the squares
It was my favorite fabric of the whole line

a closer up of everything else. I got half yards of the others.
I was proud that I only picked two solids. but I was a little disappointed that the solid green wasn't exactly as closely matched as it looked online. But over all, I'm happy with the look and I'm excited to start working.

With the SBS, I'll be doing 3 squares a month using a different technique each month (most of them I have no clue how to do - thus the name SKILL BUILDER!) and by the end, I'll have enough squares to make a queen sized quilt. I already went ahead and bought solid cream for the sashing because it was on sale!

The first blog (a log cabin) was revealed Friday and after much thought and lots of second guessing on my fabric and design choices, I finished it Tuesday night. It turned out well. I just have to make up my mind to decide and let that be it. no more, "well, what about this?" or "do you think this would look better?"

I'll try not to bore you with weekly updates and only post when I have an entire month's worth of blocks finished.